FreeNAS upgrade to 9.1.1

Upgrading FreeNAS from 8.3.1 and newer using the GUI upgrade method has worked for me twice so far without any issues. Here’s how to do it.

  1. Head over to the FreeNAS site and download the most recent (9.1.1 as of today) GUI upgrade file. Make sure to copy the SHA hash as you will need this later!

    GUI upgradesha

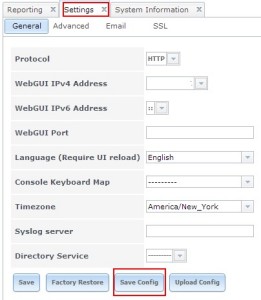
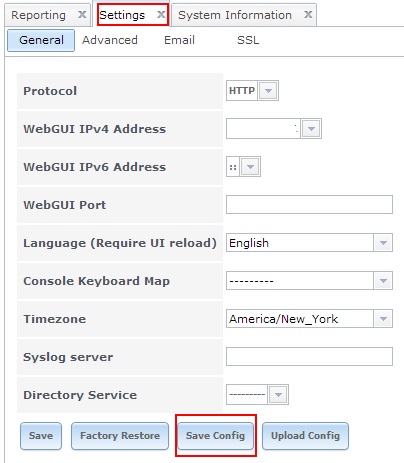
  2. Log into your FreeNAS console and select Settings and from the General menu select Save Config. This will save your current config file to your local machine.

    FreeNas-Save-Config

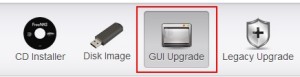
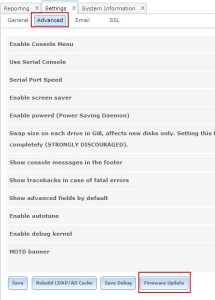
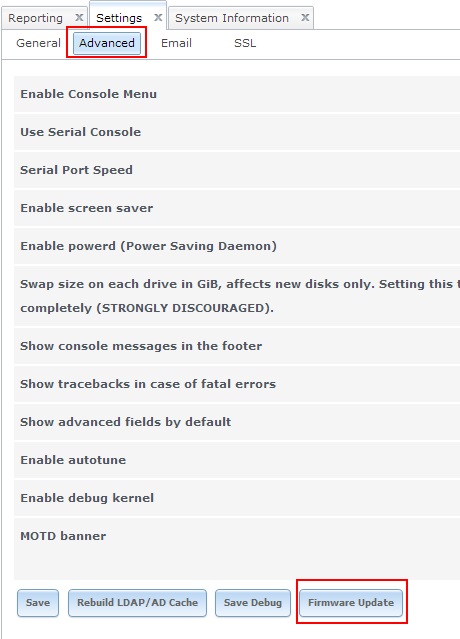
  3. Select the Advanced menu and click on Firmware Update.

    Firmware-Update

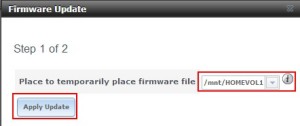
  4. On step 1 of the firmware update procedure you have an option of where to temporarily place the firmware file. I chose the main volume. Make your selection and hit Apply Update.

    Firmware-Update-2

  5. On step 2 of the firmware update procedure select Choose File and browse to the location where you downloaded the GUI upgrade file from earlier. The second input is for putting the SHA256 hash you saved earlier. (If hash does not match the upgrade will not proceed and an error will notify you). Select Apply Update.

    Firmware-Update-3

The update procedure has another window with a progress bar of sorts that at least lets you know it’s doing something. You need to be patient here, it took a good couple of minutes to see anything. If you’re worried you can see activity on your NAS if you have a display hooked up to it. When the procedure is done it will reboot the NAS and you’re done.

ZFS, NFS, ESXi and slow performance

On a previous post I mentioned putting the ZIL on a SLOG. Let me get into why this was done. There is a known problem with NFS as it relates to synchronous writes, especially with ESXi. I knew of this problem when I set out to use NFS for ESXi datastores. ESXi uses synchronous writes when writing data to a NFS datastore. ESXi sets the O_SYNC flag when writing data.

O_SYNC – The file is opened for synchronous I/O.  Any write(2)s on the resulting file descriptor will block the calling process until the data has been physically written to the underlying hardware.

So what’s happening here is that ESXi request an acknowledgement that the data it sent is actually being written to stable storage before it makes another write. Normally the ZIL (ZFS Intent Log) is stored on same storage pool where the data is being written if you do not have it on a SLOG (Separate Intent Log) device. The ZIL holds synchronous data written to it then flushes it out as a transactional write. Without the ZIL on a SLOG I got about 8MB/s writes. After I enabled the ZIL on a SLOG, which is on a SSD, I now get about 30MB/s which is a significant improvement. Keeping in mind this is on a 3 drive RAIDZ using 7200rpm disks. So you have a few choices in my opinion if you’re going to be using ESXi with NFS on ZFS:

  1. Put your ZIL on a seperate device that has a fast write speed like a SSD or some type of Flash RAM device.
  2. Use iSCSI.
  3. Don’t use ZFS.
  4. Disable sync writes. (I’d only do this if you don’t give a hoot about the data that’s being written)

Now you may need to experiment with your setup as there could be other factors creating your problems or perhaps another solution. If you go with option 1 I’d recommendan SSD with a fast write speed using SLC NAND chips.

Sources:
http://pthree.org/2012/12/06/zfs-administration-part-iii-the-zfs-intent-log/
http://forums.freenas.org/threads/sync-writes-or-why-is-my-esxi-nfs-so-slow-and-why-is-iscsi-faster.12506/
https://blogs.oracle.com/realneel/entry/the_zfs_intent_log
http://constantin.glez.de/blog/2010/07/solaris-zfs-synchronous-writes-and-zil-explained

Home Lab Part 2 – Dell C1100

C1100-1The second portion of my home lab is a Dell C1100. Actually let me be truthful, its the server formally known as C1100. If you peruse through eBay you’ll find a plethora of these 1U cloud servers. The server that I purchased is officially a CS24-TY. It’s based on the C1100. Dell supposedly made these as custom servers for customers and from what I can gather there are 1000’s of them coming off lease. My specific server came with the following:

  • 2 Intel Quad Core Xeon L5520
  • 72GB RAM (18 x 4GB)
  • 0 HDD’s
  • 2 Intel Pro1000E Gigabit ethernet ports
  • 1 Dedicated ethernet port for KVM over IP
  • 1 650 watt Power Supply
  • 1u Rack mountable case
  • 1u set of rack rails
  • Partridge in a pear tree

guts

So that’s 8 CPU cores total and a very good amount of memory. It’ll hold 4 3.5″ SATA drives and the memory can be upgraded to 144GB. I chose the Intel Xeon “L” models since they run at 60 watts (“E” series run at 80 watts). This is to coincide with one of my previous goals of low power draw while this lab is running. The purpose of the server is to host VM’s using VMware ESXi 5. ESXi is loaded on a USB thumb-drive and is connected to one of the rear USB ports.

One thing I must warn you about and that’s the noise. This beast has 6 fans in it that on average spin around 6800-8000RPM for me. Go back and read those RPM’s again, I’ll wait. I’d advise against putting this server in the same room you’re going to be in, in fact if you have dedicated room for such equipment that doesn’t seal out noise you are most likely going to hear this thing running. I currently have this one running in a structured wiring closet but I’m dealing with a heat issue now. This server plus the FreeNAS build, 2 8-port GB switches, and an ActionTec FIOS router gets kind of toasty. Check out the video below.

Custom NAS build using FreeNAS

So I embarked on the journey of building a NAS for my home lab. The purpose of this storage solution was to run VM’s and store backups from a few PC’s in my home. The build consisted of the following:

  • 3 x 2TB Seagate Barracuda 7200RPM HDD’s
  • Corsair CX430 Power Supply (80 plus)
  • NZXT Gamma Mid tower case
  • MSI B75MA-G43 Motherboard
  • Intel Celeron G1610
  • 8GB (2 x 4GB) Corsair Vengence DDR3
  • 4GB (2 x 2GB) G.Skill Ripjaws
  • Intel 313 20GB SSD
  • Crucial v4 64GB SSD
  • ADATA 8GB USB3 Thumbdrive
  • Syba PEX24033 PCI-e Dual port Gigabit ethernet

I decided to use FreeNAS 9.1.0 on this build. The FreeNAS interface is pretty good and there is a strong community behind it. FreeNAS can be ran from a USB drive which is how my NAS is currently ran. The 3 2TB HDD’s make up the main storage pool using ZFS in a RAIDZ array. A RAIDZ array is similar to RAID5. The Intel 313 20GB SSD is used for the ZIL, otherwise know as the ZFS Intent Log which when put on a separate device is known as the SLOG or separate intent log. The ZIL is primarily write intensive so its important to have a device that accommodates a lot of writes and is fast enough to receive those writes. The second SSD is used for L2ARC which is a read cache between the RAM (ARC) and your storage pool. There’s quite a bit of knowledge out there about these and I implore you to read up about them and decide if its right for you.

When this build is up and running it uses about 50-60 watts which met my needs for a decent storage location that didn’t use a lot of power. The Intel Celeron G1610 helped a lot with this. This Celeron G1610 was released this year and is based on the Ivy Bridge architecture. It was using this or an Atom processor and I chose the Celeron so it would give the NAS some uumph. The performance of this processor compared to the value of its price is awesome.

My first mistake with this build was only using 4GB of ram. ZFS will disable pre-fetching unless you have more than 4GB. Use more than 4GB! My second mistake was only have 1 on-board NIC. The dual port card was an extra purchase and helped when using it with ESXi and multiple datastores. If you are just using your NAS for basic storage you may be able to get away with just 1 NIC.

Now I have to vent about the power supply. I’ll be on my 3rd Corsair CX430 power supply in about 2 weeks. I have to applaud Corsair for their easy warranty returns but having 2 of these go bad just sucks. If this 3rd one goes bad I’ll probably return it for another brand or perhaps take a closer look at the other parts in my build to make sure nothing else could be causing the issue.

FreeNAS System

Clean install of Windows 7 using upgrade media

This is new to probably no one but since I recently had to re-install Windows 7 to a laptop I figured I’d like to do it clean vice installing Vista then upgrading to Windows 7.

  1. Install Windows 7 using the upgrade CD. Boot from the CD. Do not enter the product key during this phase!
  2. Install all 10 million updates.
  3. Open the registry editor and navigate to:HKLM\Software\Microsoft\Windows\CurrentVersion\Setup\OOBE
  4. Change MediaBootInstall to “0“.
  5. Close regedit.
  6. Open up an admin command prompt (cmd) and type:slmgr /rearm
  7. Close the cmd prompt windows and then use the Activate Windows utility to continue.